Overview
At the start of a new topic in a subject like history, it’s often necessary to familiarise students with an essential chronology of events before analysing this in terms of key questions. Simply reading through a timeline of events (or delivering a narrative lecture) to as a class is passive and unlikely to make the information ‘stick’. Instead, consider using the following strategies to help students engage with and absorb the narrative.
The following ideas can be used in sequence, or in isolation, as a way of engaging your students with the essential narrative providing the framework for the study topic.
Idea 1. “Running Dictation”
This strategy is the subject of a dedicated blog post here and is a great way of getting students running around and feverishly making hand-written notes on the key events in a timeline prior to further development. It is particularly suited to quick-fire narratives covering dramatic events like the siege of Constantinople (1453) or the Spanish Armada (1588).
Idea 2. “What should they do next?”
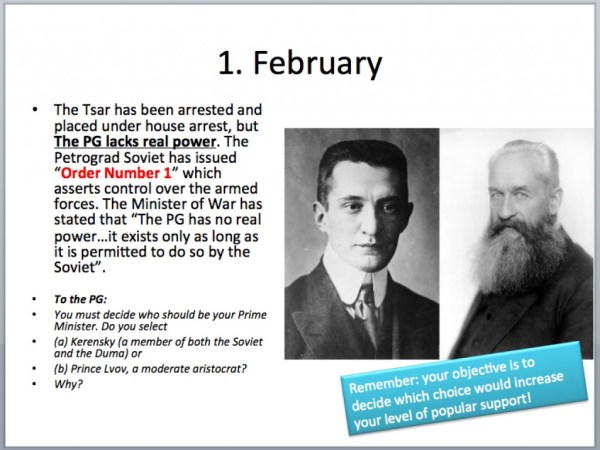
The Running Dictation is less effective for detailed stories which take place over many years. Instead, consider a teacher-led lecture using the ‘What should they do next?’ format. This is particularly good for topics based around the assessment of a particular individual’s handling of a situation. For example, when studying how successfully the Provisional Government dealt with the problems of Russia in 1917, I introduce a dilemma that they face in February on a PowerPoint slide. I then discuss with the class what the appropriate response should be to increase support for the government (sometimes providing them with several options):
I then move to the next slide which reveals what the government actually did. Students then make notes on how successfully they think the situation was handled, using a grid which is already getting them to think in terms of themes rather than a chronological narrative:
The process is repeated for other events – sometimes calling upon students to consider how the Provisional Government should act, and sometimes considering how the Bolsheviks should react. After the teacher-led element is finished, students can be provided with the complete PowerPoint presentation to develop their tables further (this is a highly efficient strategy to ensure that during the lesson they are focusing on formulating and writing judgements, rather than furiously trying to copy the factual information in each slide word for word).
Idea 3: “Re-assemble this timeline into the correct order”.
This strategy is most effective for simpler timelines with relatively few events. I use it frequently with younger classes in a quiz format to get them engaged. Start by providing students with a list of events running down the page. To the right of the events are two columns as so:
| Event | My Guess | Correct Answer | Difference |
| William has himself crowned as King of England | |||
| Edward the Confessor dies | |||
| Harold Godwineson swears to support William as the next King of England |
In “my guess” students number each event to reflect the chronological order in which they occurred (with “1” being the first event, and so on). The teacher then tells the class what the “correct answer” is for each event. Students then calculate the difference between the two numbers (note: this will always be a positive number – e.g. 5-3 would be a difference of 2, and 3-5 would also be a difference of 2). They then add up the total of the “difference” column to get an overall score: the student with the lowest overall difference is the winner!
Note: if this exercise is used to introduce – rather than to revise – a topic, then some thought should be given to providing some contextual clues within each “event” about what happened previously, or what is about to happen next (e.g. “Because Harold promised to support William, he was then allowed to go home to England”).
Idea 4. “Place each event in this list into the appropriate column”
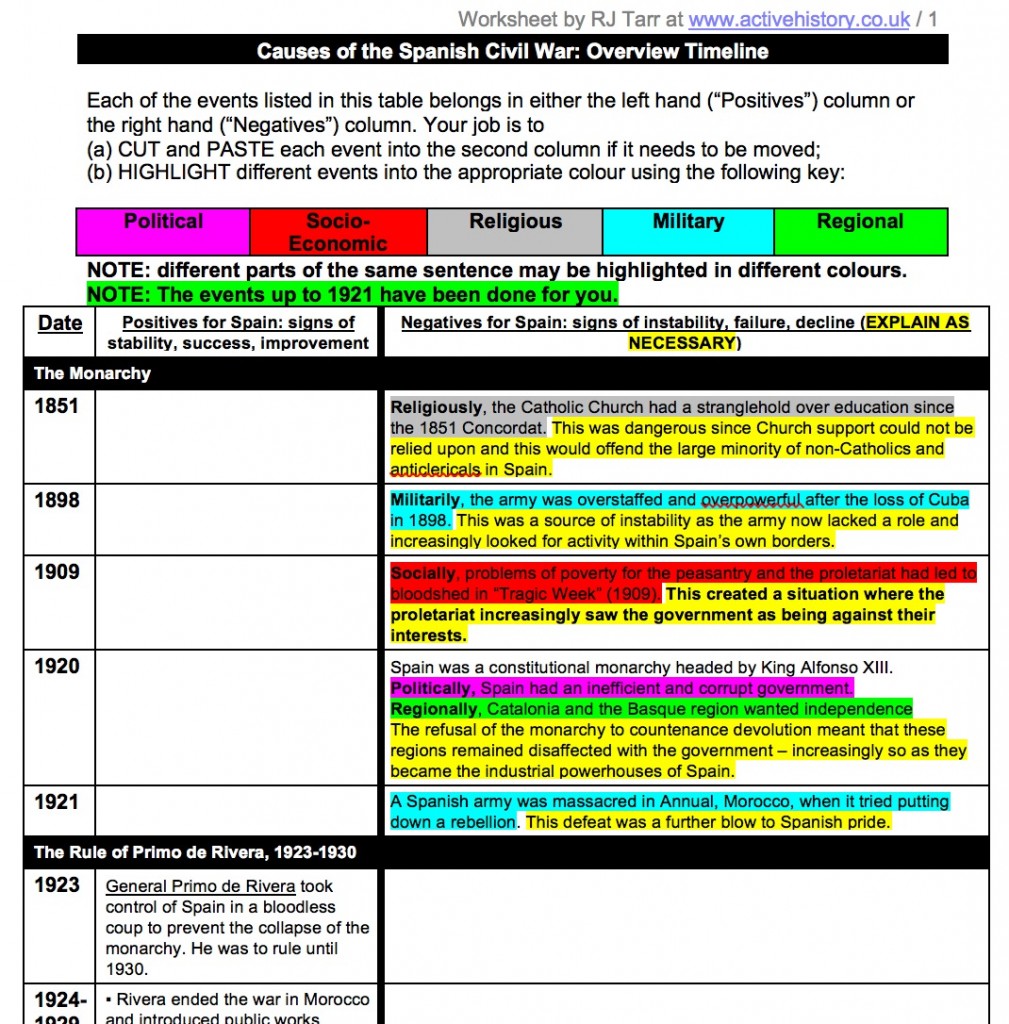
Following on from the above (or, with timelines that are too complex or detailed, starting at this point) introduce the key question for investigation (e.g. “What was the most important cause of the Spanish Civil War?”). Provide students with a timeline of events. They then have to ‘cut and paste’ each event (if using a word processor) into the correct column provided, or (if doing this as a paper-based exercise) tick the appropriate column to indicate which category the event fits into.
Idea 5. “Highlight each event in a different colour according to this key”
This is of course similar to dividing the events into columns just mentioned, but the benefit here is that the two approaches can be used in tandem to analyse the timeline in two different ways simultaneously.
Idea 6. “Elaborate on each event in the timeline with your judgement/explanation”
Students then have to justify why they have placed the event in that particular place, and colour-coded it in that particular way, by developing the sentence in their own words.
Idea 7. “Divide the timeline into obvious ‘chapters’ and give each a title”
Students then have to consider the key turning points in the narrative and ‘chunk’ the timeline into appropriate ‘chapters’. This is a useful way of helping students to see the ‘bigger picture’.
[Illustrative Example]
The following example from a worksheet on my website ActiveHistory illustrates this process in action. A detailed timeline of events leading up to the Spanish Civil War is provided. Students have to divide these firstly into columns to indicate evidence of stability and instability in Spain before 1936. Then, they colour code each event to reflect whether it is political, socio-economic, religious, military or regional in nature. At this point they are already getting an idea of which factors are coming up most frequently, at different times, and if they are a source of trouble for Spain, or maybe the opposite. Finally, they have to explain their reasoning by elaborating upon each event.
The end result is that the students have been provided with the essential background information and – much more importantly – have started to ‘own’ that knowledge by transforming it into something much more analytical and reflective.
Idea 8: “Add captioned images and extra points from the video clips for key points in the story”
In the following example, we read through the first ‘chunk’ of the timeline together, then watched a short video clip from a documentary covering this period, then made extra notes as appropriate and added an appropriate image alongside each event. In this instance, this was leading towards students making a video documentary of their own:
Idea 9. “What questions does this timeline raise that require further research?”
To lead students into an independent research activity, discuss the sorts of questions that the timeline leaves unanswered. These can be in the form of “describe” (what, who, where, when), “explain” (why?) and “assess” (to what extent?).
Idea 10. “How do we measure/prove this?”
Many of the points in the timeline will require substantiation. In the pictured example shown above, the statement is made that “The army was overstaffed and powerful”. But how do we prove this? How can this be measured? Students should identify as many of these statements as possible, turn them into questions for research (“How do we measure whether the army was overstaffed?”) and then set about finding the answer. This is particularly valuable to teach students the importance of substantiating their arguments. It also helps students formulate proper questions for research, in a form that cannot be answered by a straightforward ‘Google Search’.


